New Joiners FAQs

1. Navigate to https://www.myhcl.com

img

2. Type “My Profile- ESS” in App Search box and it will redirect to ESS homepage

img

3. Navigate to My Information-Employment, Select Reporting Manager

img

4. Change RM by updating details on Update RM

5. Click on Submit.

NOTE: There will be an auto mailer sent to the current RM to approve/reject the same and based on that will be updated after 48 hours.

1. Navigate to https://www.myhcl.com

odc1

2. Type “Access card right Management” and it will redirect to Access Homepage

odc2

3. Create a new request >new access request

odc3

Select “New joiner” checkbox and submit.

odc4

Fill all the fields according to manager’s input and submit the request.

1. Navigate to https://www.myhcl.com

ssd1

2. Type “SSD” in App search box

ssd2

3. Create a SSD Request based on problem for individual

ssd3

4. If it is an application issue >select application issues checkbox create a ticket

ssd4

5. Fill the required fields according individual problem and submit the request.

6. After Submission of SSD Request, individual can view their requests in open request.

This request type will be applicable to new joiners 7 days before or after joining. The 7 days period includes the raising of ticket and getting it approved so it can be routed to the IT queue.

1. Navigate to “sx.hcl.com”

laptop1

2. Search for Standard Laptop – New Hire and click on Order Now

laptop2

3. Select Click to start button, it navigates to “Order Now” Page

4. Fill the mandatory fields in components, Provide Information and Fulfillment information

laptop3

NOTE: Smart Recruit Number – Reporting Manager to provide

5. Finally Select Order now, there will be an Order ID generated for the requested machine and wait till the service team gets back to individual.

1. Navigate to “sx.hcl.com”

laptop4

2. Laptop Allocation - HCL Standard Laptop

laptop5

3. Select “Proceed with offering”

laptop6

4. It will redirect to checkout page

5. Select Order now, it navigates to “Order Now” Page

laptop7

6. Fill the mandatory fields in components, Provide Information and Fulfillment information

laptop8

NOTE: Choose HCL Standard for Windows Machine or Non Standard for MacBook.

7. Finally Select Order now, there will be an Order ID generated for the requested machine. Now, wait till service team get back to individual.

1. Navigate to https://www.myhcl.com

skill1

2. Type “My Skill profile(SPS)” in App search box

skill2

3. Select “Select Skill”

skill3

4. Fill the above skill categories according to individual

5. If employee has multiple skill area expertise, select primary skill and submit the skills

skill4

1. Navigate to https://www.myhcl.com

jbc1

2. Type “isuccess Learning ” in App search box in step 1

jbc2

3. Select “My Curricula”

jbc3

4. Select to do button and check what are the trainings assigned to individual

jbc4

5. If assigned trainings are not matching individual skill expertise

6. Complete all mandatory trainings and job based trainings assigned to individual.

jbc5

7. Complete all trainings before due date to avoid non-compliance complications.

8. In case of any queries for JBC – please contact the SPOC - Sangram Keshari Swain - ERS, HCL Tech (Email Id: Sangram.Swain@hcl.com)

1. Navigate to https://www.myhcl.com

it1

2. Type “IT Declaration” in App search box

it2

3. You have chosen Old Tax Regime or New Tax Regime

it3

4. Fill the required fields or section as per instructions (HRA, PARTICULARS FOR DEDUCTION UNDER SECTION 80C, etc.).

it4

5. After fill the complete details Save and Submit to ES.

1. Navigate to https://www.myhcl.com

claim1

2. Type “Global Claims System” in App search box

claim2

3. Once you go to Global Claims System, have to choose Claim type

 a. Conveyance

 b. Cell Phone

 c. Salary/Medical Advance

 d. F & M

 e. Cab Breakdown Expense

 f. Advance Settlement

 g. Travel Claim

 h. More Claims

4. After selecting the Claim type, you will navigate to claims details page

claim3

5. After fill the require details attached respective bills and submit.

6. After approving by your manager, it will take 10 to 20 days to reimbursement

1. Navigate to https://www.myhcl.com

time1

time2

2. Select Phase/Activity and add WBS Component assigned to individual and fill the time sheet.

1. Navigate to https://www.myhcl.com

digi1

2. Type “iTime” in App Search box, click the generated option and it will redirect to DigitalAct page

digi2

3. Click the ‘Check In’ button to start the day and the ‘Check Out’ button to round the day off.

4. Enter the work summary without which an error would be display.

5. Click on ‘Submit’ and verify the entry table has been updated below

digi3

6. It is advisable to update the same each day. However, in case of any exception the user can check the box stating ‘I missed doing timely check-in...’ and enter time for both check in and check out for the respective day. Make sure the time check in is >= 9 hours.

digi4

7. This feature allows logging check-in times of at most 5 working days at a stretch.

8. Scroll to the bottom of the page and click on ‘Continue to iTime’ button to navigate to parking time sheet hours.

NOTE: Missing to fill Digi ACT for even 1 day in a quarter will result in a 20% deduction in EPB (Applicable to E0-E3 Bands)

1. Navigate to https://www.myhcl.com

2. Type “India LMS” in App Search box and it will redirect to LMS homepage.

leave1

3. You can choose the date and click on apply.

leave2

4. The page will be redirected - select the type of leave (Restricted, annual, my leave) from the drop down available next to the date and submit. (Also, if you wish to apply half day leave you can click on the first half of the Sun icon left to the date for the first half and likewise for the second half.)

NOTE: There will be an auto mailer sent to the current RM to approve/reject the same.

Link for Adobe Holiday List : Vacation and national holidays | Adobe Benefits

Contact IT Service Desk

Call - Ext. 6-HELP, (external numbers given below)

Web/Chat -Link

REGION EXTERNAL NUMBERS

Americas (408) 536-4357

(800) 866-8006 ext. 6-4357

Japan +81 (3) 5740-1249

EMEA +353 (1) 242 6767

India 1800 208 9444

Asia Pacific Call your local office and enter/ask for ext. 6-HELP

Note: Before call on above number keep handy your Adobe LDAP ID and Adobe Employee ID.
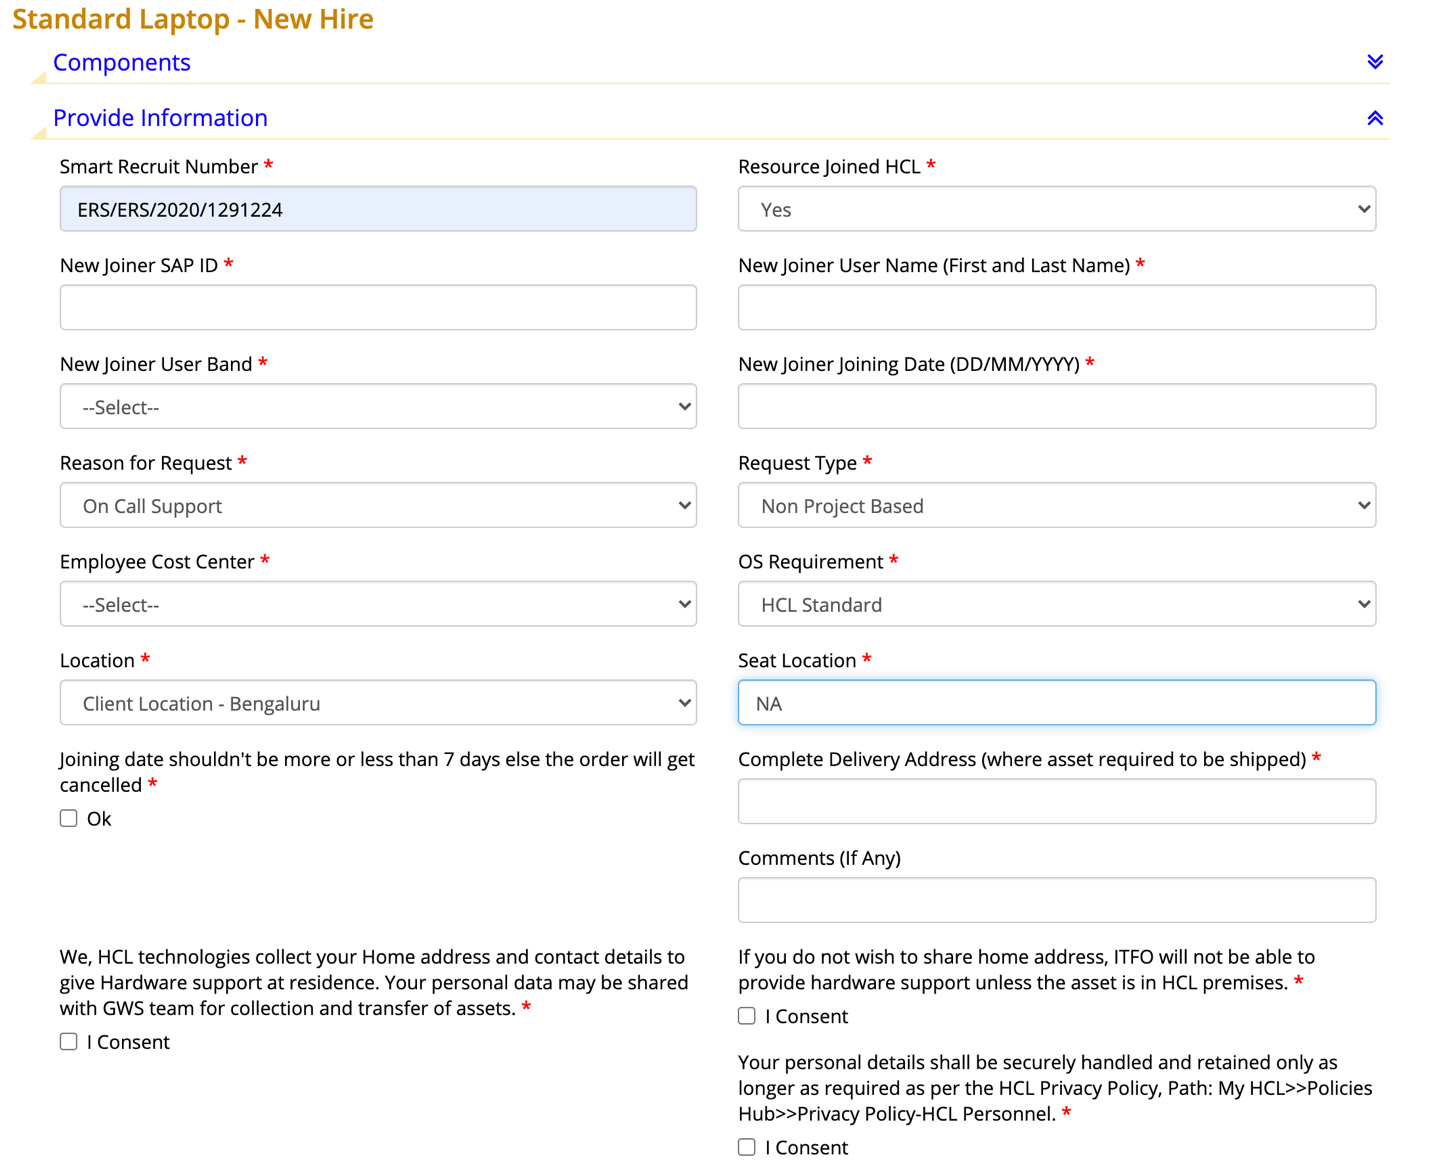
Pre-requisite:

- Employer should be logged into myhcl.

When employer will receive the Xtramiles:

- Employer will receive Xtramiles for Birthday’s, on every completion of 1 year in HCL, Appreciations from Client’s, Managers, colleagues etc.

- An email will be triggered from the rewards / HR team once they receive the Xtramiles.

XtraMiles:

1. Navigate to Myhcl.com: https://www.myhcl.com/bprhome/Home/Index

2. After the page is displayed – in the search box – enter Xtramiles and select the option displayed.

xtramile1

3. Employer will be redirected to the https://xtramiles.myhcl.com/Home/Index link.

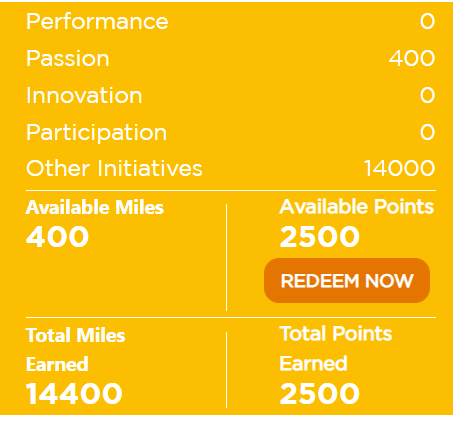
4. Once employer receives the points – this will be displayed in the right side of the website – similar to the screenshot below:

xtramile2

5. Regarding the process on the Xtramiles – navigate to the below link AND go through the process https://xtramiles.myhcl.com/Home/Process

How to redeem the points:?

Employer should have minimum points to redeem – this minimum points will be mentioned in the process link shared in point 5

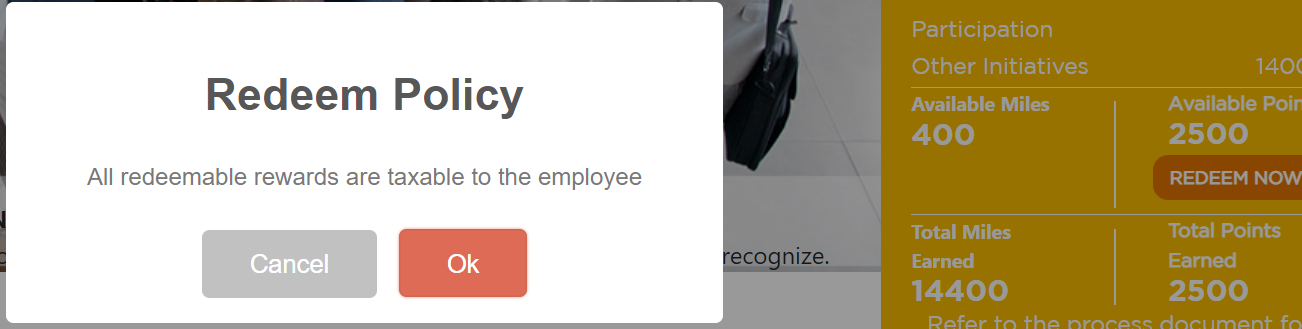
1. Clicking on “REDEEM NOW” button – shows a pop up and click on OK button. Screenshot attached below for reference.

xtramile3

2. Clicking on Ok button – new link will be opened in a new tab – the link is - https://stores.xoxoday.com/hcl-technologies-limited/

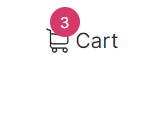
3. Based on the points – select the voucher from the available categories and add it to the Cart.

4. Click on Cart Icon – present in the Top right corner of the link.

xtramile4

5. Click on “Proceed to checkout” button

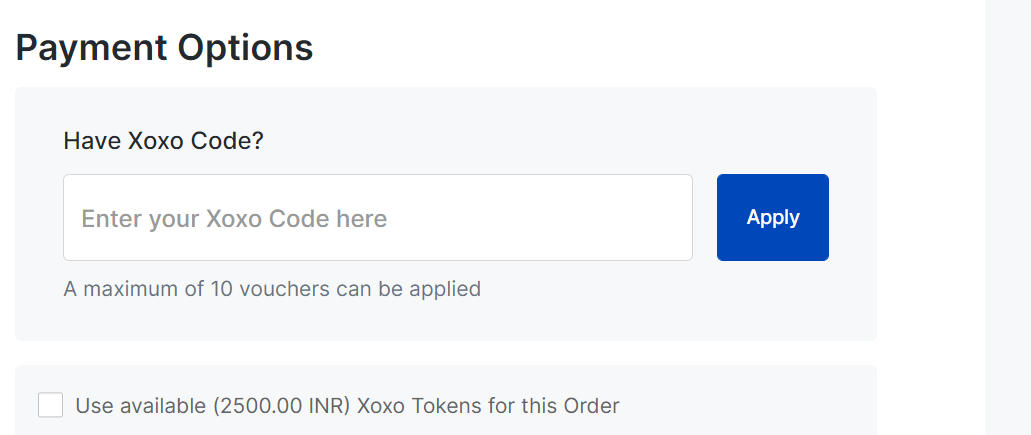
6. There will be a checkbox “Use xoxo” points to redeem – click on the checkbox as per the screenshot attached below:

xtramile5

xtramile6

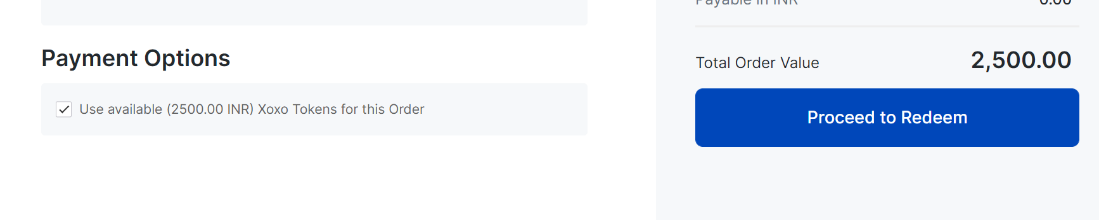
7. Click on Proceed to Redeem button.

8. Order number will be generated and an email will be generated and delivered to the inbox.

xtramile7

For any queries on the Xtramiles or the application: please log an SSD ticket.

Follow the below steps for logging an SSD ticket:

1. Navigate to Myhcl.com: https://www.myhcl.com/bprhome/Home/Index

2. Enter SSD in the search box and click on Smart Service Desk (SSD) – will be redirected to the https://ssd.myhcl.com/Requestor/Request/myRequest link.

3. Click on Create New Request option present in the top right corner of the link.

xtramile8

4. Drop down will be displayed and click/select Problem Ticket option.

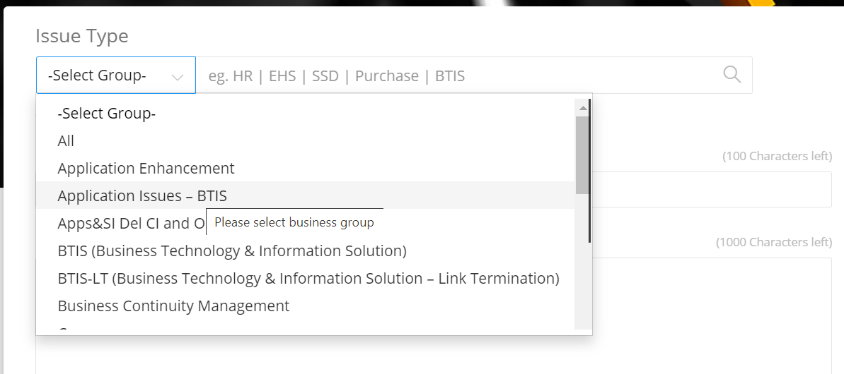
5. https://ssd.myhcl.com/Requestor/Request/CreatemyNewProblemTicket - and in this link – please select the following options:

Issue Type:

Select Group: Application Issues – BTIS

xtramile9

6. In the next tab – enter/type – Xtramiles – Application Issues.

7. Enter the Issue description and enter the Long Issue Description (Optional)

8. Click on Next > option

9. Click on SKIP AND RAISE SSD in the next screen

10. In the Next screen – please review whether all the values are prefilled in the fields present and each of the field is a mandatory field.

11. Drop the file attached in case of any screenshot taken in the Xtramiles application.

12. Click on Proceed button.

13. Request should be submitted successfully.

During Pandemics or other exceptional scenarios, all HCL employees are to follow the below instructions:

1. Stay in touch with your RM

2. Follow HR and Risk Team Advisory shared through emails on HCL Mail ID

3. Follow BCP protocols when invoked (RM will update)

4. Raise Telecommute request as advised by RM (process document attached)

Download PDF

For IT Support employees should use SX (Service Exchange) system to raise the ticket under the offering name “ERS WFH enablement” which is created only for ERS LOB, for the issues related to the listed categories. By doing this, the tickets will be first routed to the ERS IT Help Desk team to get the priority service. This team will redirect the tickets to GIT if they can’t resolve by themselves to speed it up.

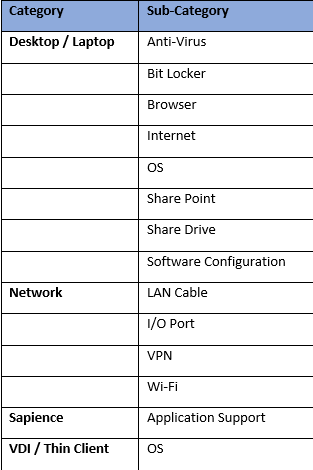
Categories supported by ERS IT Helpdesk

ss1